

How To Install and Activate Your TravelGator eSIM: Your Complete Travel Companion
Skip the Airport SIM Card Lines Forever
We've all been there: exhausted from a long flight, eager to explore your destination, but stuck waiting in endless airport lines just to buy a local SIM card. The hassle of swapping tiny cards, worrying about losing them, and dealing with complicated activation processes can put a damper on the start of any adventure.
That's where TravelGator comes in. Our eSIMs are digital SIM cards that you download directly to your phone before you even leave home. No more airport queues, no more fumbling with SIM ejector tools, and no more lost SIM cards at the bottom of your luggage.

Image Created with AI Tools
In this guide, we'll walk you through everything you need to know to get connected with TravelGator in just three simple steps.
In This Article:
- Why Choose TravelGator eSIM?
- Before You Begin: Essential Preparations
- Step 1: Purchase Your TravelGator eSIM
- Step 2: Install Your eSIM
- Step 3: Activate at Your Destination
- Frequently Asked Questions
Why Choose TravelGator eSIM?

Image Created with AI Tools
TravelGator makes staying connected abroad simple, affordable, and hassle-free. Here's what sets us apart:
No Surprise Roaming Charges - All our plans are prepaid. You pay upfront for exactly the data you need, with no hidden fees or shocking bills when you return home.
Freedom to Choose - You're not locked into any carrier. Select the plan that fits your trip perfectly, whether you're island-hopping in Southeast Asia or road-tripping across the USA.
Local Network Connection - We partner with trusted local carriers in each destination to ensure you get reliable coverage and competitive prices, just like a local would.
Simple Tracking - Monitor your data usage anytime through our easy-to-use tracking portal at track.travelgatorsim.com.
Before You Begin: Essential Preparations

Image Created with AI Tools
Before installing your TravelGator eSIM, make sure your device meets these three requirements:
1) Verify Your Phone Is Unlocked
Your phone needs to be carrier-unlocked, meaning it's not tied to a contract with a specific mobile provider. If you're unsure, contact your carrier or check your settings.


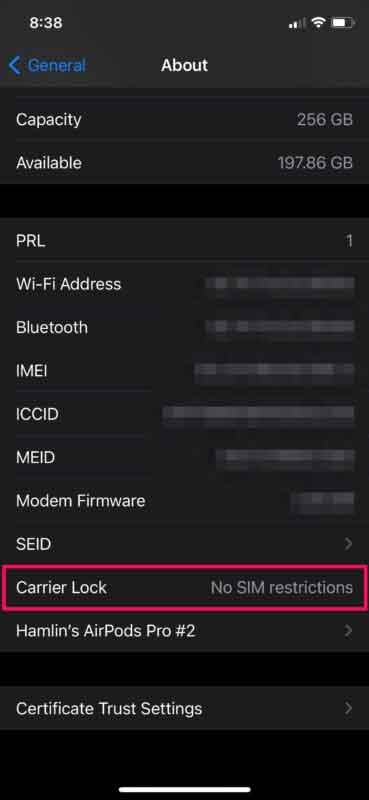
Images : WikiHow
For iPhone:
- Go to Settings
- Tap General
- Tap About
- Scroll to "Carrier Lock" or "Network Provider Lock"
- If it says "No SIM restrictions," you're good to go
Images : fixyourandroid.com
For Android:
- Open Settings
- Tap "Network & Internet" or "Connections"
- Tap "SIMs" or "Mobile Network"
- If you see options to manage multiple SIMs or select network operators, your phone is likely unlocked
2) Confirm Your Phone Supports eSIM
Not all phones support eSIM technology, even newer models. Compatibility depends on the specific model and where it was manufactured, not just the release year.
Quick Check Methods:
Method 1: Settings Check
- Open your phone's Settings
- Navigate to your SIM or Mobile Network settings
- Look for "Add eSIM" or "Download SIM" option
- If present, you're eSIM-ready
Method 2: IMEI/EID Check
- Dial *#06# on your phone
- If you see an EID number appear, your phone supports eSIM
- Two IMEI numbers usually indicate dual-SIM support (physical + eSIM)
Method 3: Check Compatibility Lists
- For iPhone: Visit Apple's official eSIM support page
- For Android: Check GSMArena's eSIM filter tool
- Or visit TravelGator's compatibility page for the latest list

Image Created with AI Tools
3) Connect to Stable Wi-Fi
This is crucial: eSIMs can only be installed once. A dropped connection during installation can cause the process to fail, and you'll need to contact support for a replacement.
We strongly recommend installing your eSIM before leaving home while connected to your reliable home Wi-Fi. Don't worry about activation timing—most TravelGator eSIMs only start their validity period when you connect to the mobile network at your destination, not when you install them.

Image Created with AI Tools
Step 1: Purchase Your TravelGator eSIM

Image : Travelgator , (AI-modified)
Getting your TravelGator eSIM is quick and easy:
- Visit travelgatorsim.com
- Browse our destinations by region: Asia, Americas, Oceania, Europe, or Middle East
- Select your travel destination
- Choose your data package based on trip length and usage needs
- Complete your purchase using your preferred payment method
Choosing the Right Data Package
TravelGator offers flexible data packages ranging from 1GB to 12GB with validity periods from 1 to 30 days, designed to match your travel style and duration.
1-3GB Plans - Perfect for short weekend getaways or light users who mainly need data for messaging apps, maps, and occasional browsing. Ideal for 1-7 day trips.
5-8GB Plans - Great for week-long adventures with moderate social media posting, video calls, regular navigation, and staying connected with family back home. Suits most travelers on 7-14 day trips.
10-12GB Plans - Ideal for extended trips or active users who stream music, share lots of photos and videos, work remotely, or need reliable connectivity for 2-4 weeks of travel.
Image Created with AI Tools
Reloadable eSIMs: Use Again and Again
One of TravelGator's best features is our reloadable eSIM plans. Once you've installed a TravelGator eSIM, you can top it up for future trips to the same destination without having to install a new eSIM each time. This saves you time and hassle on return visits.
How Reloadable eSIMs Work:
- Install your TravelGator eSIM once
- Use it during your trip
- When planning your next visit to the same destination, simply purchase a top-up package
- Your existing eSIM reactivates with fresh data—no reinstallation needed
Each eSIM has a unique identifier called an ICCID (Integrated Circuit Card Identifier). This is essentially your eSIM's "serial number" that allows you to manage, track, and reload your specific eSIM. You'll need your ICCID when topping up or tracking your data usage.
Unsure what an ICCID is? Read our comprehensive guide: What is ICCID? Complete eSIM Guide
Pro Tip: Most TravelGator eSIMs are data-only plans, but you can use WhatsApp, Telegram, FaceTime, or other internet-based apps for calls and messages.
Regional eSIM Options
Single Country eSIM - Best for travelers visiting one destination. Optimized for that specific country's networks, offering the most reliable connection and best value for single-country trips.
Europe Roaming Pass - Seamlessly connect across multiple European countries without switching eSIMs or buying new plans. Perfect for Euro trips, city hopping, or multi-country adventures across the continent.
Step 2: Install Your eSIM

After purchasing, you'll receive an email from TravelGator containing your eSIM activation details. Make sure you're connected to Wi-Fi, then choose your installation method:

Option A: QR Code Installation (Recommended - Easiest Method)
For iPhone:
- Open the email from TravelGator
- Locate your QR code
- On your iPhone, go to Settings > Mobile Data (or Cellular)
- Tap "Add eSIM"
- Use your phone's camera to scan the QR code
- Follow the on-screen prompts to complete installation
- When prompted, label your eSIM (e.g., "Japan Travel" or "TravelGator")

For Android:
- Go to Settings > Connections
- Select "SIM card manager"
- Tap "Add mobile plan"
- Scan the QR code from your TravelGator email
- Complete the setup process
- Label your eSIM for easy identification
Option B: Manual Installation
If you prefer manual entry or have issues scanning the QR code:
For iPhone:
- Go to Settings > Mobile Data > Add eSIM
- Select "Enter Details Manually"
- Enter the SM-DP+ Address from your email
- Enter the Activation Code
- No confirmation code is needed
- Complete the installation
For Android:
- Go to Settings > Connections > SIM card manager
- Select "Add mobile plan"
- Choose "Enter details manually"
- Input the SM-DP+ Address and Activation Code from your email
- Complete the setup
Important Installation Notes
- Your eSIM will be added to your device but NOT activated yet
- Don't turn on the eSIM or enable data roaming until you reach your destination
- The eSIM installation can be done days or weeks before your trip
- You can store multiple eSIMs on your phone for different destinations
Step 3: Activate at Your Destination
Once you've arrived at your destination, it's time to activate your TravelGator eSIM and get connected.
For iPhone Users:
Turn On Your eSIM Line:
- Go to Settings
- Tap "Mobile Service" (or "Cellular")
- Select your TravelGator eSIM
- Toggle "Turn On This Line" to ON
- Go back to Mobile Service menu
- Tap "Mobile Data" (or "Cellular Data")
- Select your TravelGator eSIM (instead of your primary line)
Enable Data Roaming:
- Still in Settings > Mobile Service
- Select your TravelGator eSIM
- Scroll down and toggle "Data Roaming" to ON
Important: To avoid charges from your home carrier, make sure mobile data is disabled on your primary SIM while keeping it enabled for your TravelGator eSIM.

For Android Users:
Turn On Your eSIM:
- Go to Settings
- Tap "Connections"
- Tap "Mobile Networks"
- Turn ON your TravelGator eSIM
- Turn ON Mobile Data
- Make sure Mobile Data is set to your eSIM (not your primary line)
Enable Data Roaming:
- In Settings > Connections > Mobile Networks
- Make sure "Data Roaming" is turned ON
Troubleshooting Connection Issues
If you don't connect immediately, try these steps:
Basic Troubleshooting:
- Turn your phone off and on again
- Enable Airplane Mode for 10 seconds, then disable it
- Manually select a network: Go to Settings > Mobile Networks > Network Operators > Search Networks
- Check that you've followed all activation steps correctly
Configure Data Settings (APN):
Sometimes you may need to manually configure your Access Point Name (APN) settings. These details are provided in your TravelGator email.
- Go to Settings > Mobile Data (or Cellular)
- Select your TravelGator eSIM plan
- Make sure Data Roaming is turned ON
- Verify you're connected to the correct network operator
- Tap Mobile Data Network (iOS) or Access Point Names (Android)
- Enter the APN settings exactly as shown in your TravelGator email
Important: Always refer to your confirmation email for the correct APN configuration.
Still Having Issues?
- Visit our FAQ page for additional help
- Contact our support team through the Contact page
- Check your data usage tracker to confirm your plan is active
Frequently Asked Questions

Image Created with AI Tools
What can I do with my TravelGator eSIM?
Everything you'd do with a regular SIM card: browse the internet, use apps, post to social media, navigate with maps, and make calls through internet-based apps like WhatsApp, FaceTime, or Telegram.
Can I use my regular SIM and TravelGator eSIM together?
Absolutely! Most modern phones support using multiple SIMs simultaneously. You can keep your home SIM active for calls and texts while using your TravelGator eSIM for data. Just make sure mobile data is turned off on your primary SIM to avoid roaming charges.
How many eSIMs can I have on my phone?
You can typically store 5-10 eSIMs on your device (depending on your phone model), but only 1-2 can be active at the same time. This means you can pre-load eSIMs for multiple upcoming trips without having to reinstall them each time.
How do I switch between eSIMs?
When you install each eSIM, give it a clear label (like "Japan eSIM," "Europe eSIM," or "Singapore eSIM"). You can then easily toggle between them in your Settings > Mobile Networks menu.
When does my TravelGator eSIM activate?
Most TravelGator eSIMs activate when you connect to a supported mobile network at your destination, not when you install them. This means you can install your eSIM before your trip without wasting any data or validity time.
How do I track my data usage?
Visit track.travelgatorsim.com and enter your eSIM details to monitor your remaining data in real-time.
What happens when my data runs out?
If it does, you can easily add more data through our website. If your plan doesn't support top-ups, you can purchase a new eSIM for that destination.
Do TravelGator eSIMs expire?
Your data package is valid for the number of days you selected at purchase. For example, a 7-day 10GB plan gives you 10GB to use over 7 days. After that period, the data expires. However, the eSIM itself remains on your phone and can often be topped up for future trips, depending on the plan.
Important:
- If unactivated, the eSIM has an expiry of one year from the date of purchase.
- If activated and the data plan period has ended, the eSIM has an expiry of one year from end date.
Can I get a refund if I don't use my eSIM?
Please check our refund policy on the TravelGator website.
What if I need help?
Visit our Contact page at travelgatorsim.com/pages/contact or check our comprehensive FAQ section at travelgatorsim.com/pages/faq. You can also redeem codes and access additional support at redeem.travelgatorsim.com.
Ready to Travel Smarter?

Image Created with AI Tools
With your TravelGator eSIM installed and ready to go, you're all set for hassle-free connectivity on your next adventure. No more airport queues, no more fumbling with tiny SIM cards, and no more bill shock from roaming charges.
Browse our destination packages at travelgatorsim.com and join Ali the Alligator on his next journey. Grab your carry-on, hop on the travellator, and start traveling the smart way!
Popular TravelGator Destinations:
- And many more destinations worldwide !
Additional Resources
- Track Your Usage: track.travelgatorsim.com
- Redeem Codes: redeem.travelgatorsim.com
- iOS Activation Guide: travelgatorsim.com/pages/ios-activation
- Android Activation Guide: travelgatorsim.com/pages/android-activation
- Complete FAQ: travelgatorsim.com/pages/faq
- Contact Support: travelgatorsim.com/pages/contact
Safe travels with TravelGator! 🐊✈️
Ali the Alligator grabs his carry-on, gets on the travellator to go travelling.